Cabin Wall Rebuild Part 2: Fairing, Epoxy, New Hatch, and More Fairing
Now that Rick and Jayme were done with their portion of the work, it was on to my portion. I had to fair all of the cabin walls, fill some areas with thickened epoxy, and install a new hatch. I did this over the course of like two months, so I’m going to break it down by project.
Let’s start with the fairing. Basically, fairing is kind of like Bondo for a car. It’s a filler that is easily sandable. You apply it with a scraper and push it into holes and dents, then sand it smooth. Since fiberglass has a texture to it, you need to fill all those tiny dents. I used West Systems 410 with the epoxy, since I had the epoxy, and was worried that mixing different brands might affect the outcome. 410 looks like hot chocolate mix, but mixes a lot more easily than the 406. Since I had so much area to cover, I was doing fairly large “10 pump” batches. Even then, it took a few days to apply it all. At a certain point, I used the wrong hardener for the temperature, and it started smoking. Oops. While I can apply the fairing in the marina, I can’t sand it. So that will have to wait for the boatyard. I checked with West Systems, and they said that leaving fairing in the sun for a month or two is fine, so I didn’t have to add primer. Besides, I still had the boat tent up.


In some areas, the dents or holes were pretty large, so I filled with thickened epoxy first. The 406 is more structural, and I wanted to error on the side of overkill.
Meanwhile, there were a few areas that had rotted but weren’t part of the initial contract with Rick and Jayme, so those were on me. I ripped out as much of the bad wood as I could. Then I saturated the area with penetrating epoxy. Once that was cured, I used thickened epoxy to fill the bulk of it. Lastly, I added the fairing. These were smallish areas (around 6 inches max), so I didn’t replace the wood itself. Time will tell if this was a mistake.


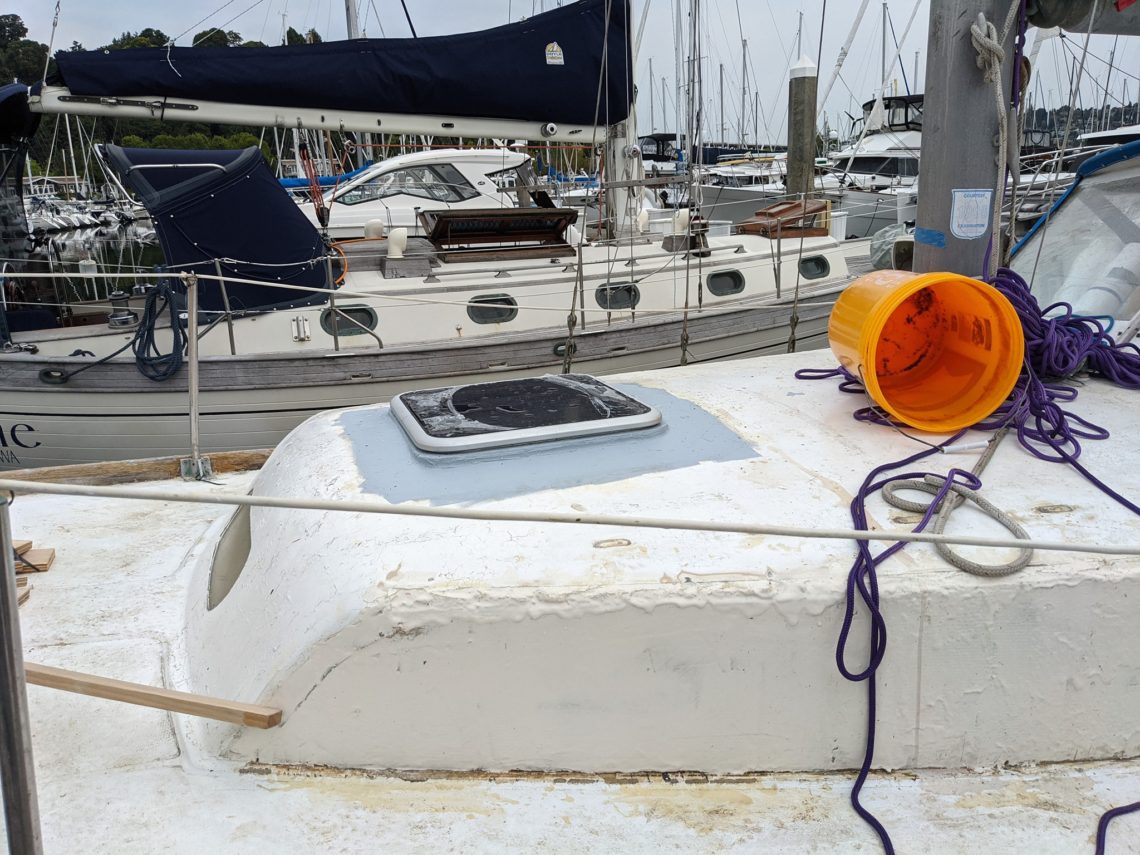
Lastly it was time for the hatch. This proved to be a lot more of a project than I initially intended. The original hatch was a neat design, with a scoop vent on the top, but it had been soaked with paint over the years, so it was hard to move. The window had long since glazed over. Plus it leaked and caused damage to the cabin top. I filled that cabin top as described in the previous paragraph. Then I grinded (ground?) all the way around the hatch and added a layer of fiberglass, rolling it over the edge into the hatch hole. I didn’t want it to leak again.


Then I realized that if I just installed the hatch on the cabin top, water was going to get into the seal. So I needed to raise it up. I took some 1/4 inch plywood and cut it to size. I glued that with thickened epoxy, and then stuffed more thickened epoxy into any gaps. Here’s where I added a few steps to my life, because I’m stupid. The new hatch is about 1/2 and inch smaller than the old hatch. That meant the plywood I just installed had a bit of a lip. So I used a flush mount bit on my router to expand that so the new hole was the same size as the old hole. Except that now there were gaps that weren’t covered by the new hatch. Stupid.


The plywood also wasn’t as flat as I would have liked. I tried adding more fairing to level it. But that didn’t work. In the end, I grinded the center of the plywood almost down to nothing, while leaving the outsides of the plywood alone. That gave me a nice flat surface. But it was still a little low, so I added another layer of plywood. This time, I didn’t expand the hole in the plywood. Instead, I shrank the hole in the cabin with thickened epoxy. Same result, but in the opposite direction.
I soaked the wood with penetrating epoxy to seal it, then added a thickened epoxy fillet around the edge to be all sexy like. I had considered adding more fiberglass, but I was running out of time, and it would have added more fairing. At this point I was far beyond done with fairing. I also drilled out oversized holes for the screws, and filled them with thickened epoxy. This will not leak ever again.
While this was only few paragraphs to write, it actually translated to weekend after weekend after weekend of work, because I had to wait a day in between each step, to let the epoxy cure.


But now we have a surface that I can accept. I sanded it as best I could, and applied two layers of primer. It doesn’t look perfect, but I was running out of time. I found that foam rollers worked best. I also put on 2 layers of paint on the outside, and 2 layers of paint on the inside. The inside paint was far too light for my taste, but again, I was running out of time. Once all of that was done, I drilled the screw holes again. This is a process known as “drill fill drill”. You drill an oversized hole, fill it with thickened epoxy, then drill the correct size hole. This way the screws are biting into epoxy, not wood. If they leak, they only get to the epoxy, which doesn’t rot. I will be doing this a lot for the rest of the refit.
I added two rows of butyl tape. One on the main surface, and one on the corner of the frame. Butyl tape is ideal for this situation because it is great as a seal, but doesn’t have much of an adhesive property. That means that it will be water tight, but if I ever do need to replace something, it comes right off with some rubbing alcohol and a sponge. The screws hold the hatch down, not the seal. Then I crossed my fingers and installed the hatch. It was a little tight, which I see as a good thing, because hopefully water will have an equally hard time getting in. They say you should let butyl tape cure for 12 hours. I gave it 36. Then I flooded the hatch from every possible direction. I went inside. I ran my fingers along the bottom of the hatch.
Not. A. Drop. Finally something went right. This was a wonderful reward for what felt like an eternity of work.
It was now time to prepare for the boatyard. I pulled the tent down (Finally. It had been up for like 4 months, and was super embarrassing next to all the sexy yachts in my marina), reorganized all of my supplies, and had a panic attack. My haulout is scheduled for mid August, where I’ll get the rest of this horrible nightmare of a project done. See you then.
Chris Dantes
My name is Chris. I currently live in Seattle, though I’m formerly from California. I'm a writer, comic, and superhero (allegedly). I complain. A lot. About everything. I also tell jokes.


2 Comments
Pingback:
Pingback: